Happy Hump Day, bloggers! This week has been a little crazy and is only going to get crazier: a friend of mine from years ago is going to be in town tomorrow with a little band called Every Time I Die. I get to see Ryan every year or so when his band travels through town; I saw him a few years ago at Warped Tour and in 2008 with Dead and Divine. It's always so great to see him and I'm really looking forward to him getting into town! Do you have any fun plans for April Fool's Day?
This weekend, I had to pull a dig-through-the-cabinets meal. I didn't feel like going to the store and I had some stuff in the fridge I had to use up. Mandarin oranges, asparagus, tempeh, and couscous make up this amazing meal. I think you might just need to try this tempeh!
Asian Orange Tempeh
Prep time: 10 minutes, plus marinading time
Cook time: 15 minutes
8 oz package tempeh (I use Westsoy)
2 8-oz cans Mandarin oranges in juice, mashed
2 tbsp Bragg's Liquid Aminos (soy sauce or tamari will work, too)
1 tbsp freshly grated ginger
3 garlic cloves, minced
1/4-1/2 tsp red pepper flakes
1 tbsp coconut oil
1. Cut your tempeh into small triangles. The way I cut it, I get 16 pieces. Put into a large bowl with all the other ingredients and let marinade for at least 30 minutes (mine was hanging out for 6 hours!)
2. Heat coconut oil in a large pan over medium-high heat. Carefully place tempeh in the pan with enough room to flip. The key here is to get dark brown bits all over the tempeh. I promise, they don't taste burnt. They're amazing. Let the tempeh cook for at least 5 minutes before checking. Once they're dark brown, flip, and continue to brown. Ta da!
I paired my tempeh with some roasted pine nut couscous (so yummy!) and some steamed asparagus. Quick tip on the asparagus: I love roasting asparagus, but steaming it till al dente is also fantastic. To steam mine, I put about an inch of water in my pan along with on stalk of fresh rosemary and 3 cloves of smashed garlic. Put the steamer basket in, bring to a boil, and steam for 5-7 minutes. The flavored water adds just a hint of extra delicious to the asparagus.
Hope you all have a wonderful downhill to your week!
Wednesday, March 31, 2010
Sunday, March 28, 2010
Spinach & Mushroom Florentine Crepes
I always make huge breakfasts on the weekend. Maybe not huge in the serving size, but huge in flavor, effort, and presentation. The husband & I only get 2 days a week for the gloriousness that is breaking the fast, so I make it count. Last weekend, I took my first stab at crepes. Apparently being french really helps because I am a crepe master.
Saturday was banana crepes with a blueberry rice syrup topping (sent to me by the wonderful people at Suzanne's Specialties...I have SO many samples, keep your eyes peeled for another giveaway!!!). I had leftover crepes, so Sunday I threw together this amazing breakfast that I personally believe topped all other breakfasts prior.
(Yes, there is already a bite taken. I was hungry...and I'm not a photographer.)
Spinach & Mushroom Florentine Crepes
Prep time: 10 minutes
Cook time: 10 minutes
Crepes
1 1/2 cups almond milk (or your favorite nondairy milk)
1/4 cup water
2 tbsp agave nectar or pure maple syrup
3/4 cup all-purpose flour
1/4 cup chickpea flour
1 tbsp tapioca flour (cornstarch or arrowroot is okay, too)
1/2 tsp salt
1. Put all the ingredients into a food processor or blender. Blend for about 30 seconds, scraping the sides of the blender once, until everything is smooth. The batter will be very thin. Refrigerate batter for about an hour (I didn't do this and they came out fine!)
2. Preheat a crepe pan or large, nonstick skillet over medium-high heat. The pan is ready when a few drops of water flicked onto it sizzle. Lightly spray the pan with oil.
3. Ladle about 1/3 to 1/2 cup batter (use the bigger amount for a bigger pan) in the center of the pan. Lift the pan off the burner and tilt in a circular motion so that the batter spreads in a thin layer across the bottom.
4. Cook until the top of the crepe is dry, the center is bubbling, and the edges are lightly browned and crinkly and are pulling away from the sides of the pan, usually about 1 to 1 1/2 minutes. Gently run the spatula under the crepe to loosen, then carefully flip and cook on the other side for 30 seconds. Slide the crepe onto a dinner plate. Repeat with the remaining crepes.
(Credit for this recipe is given to the amazing Isa Chandra Moskowitz)
Spinach & Mushroom Florentine
1 cup thinly sliced mushrooms (I used baby bella)
2 cups fresh baby spinach
1 tsp fresh rosemary, chopped
2 tbsp olive oil
1 tsp black pepper
1/4 cup veganaise
1. Heat the olive oil in a large skillet over medium heat. Add the mushrooms and rosemary; cook until mushrooms have released their juice and are nice and brown. Add the spinach and wilt. (If you feel the need to add more spinach, please, do so.)
2. Add the black pepper and veganaise, making sure to coat the mushroom mixture. Put a few spoonfuls inside your prepared crepes, fold over, and add a little bit of the sauce on top.
This was such a simple yet AH-MAZING breakfast. I'm looking forward to my mom coming out so I can make it for her. :)
PS: If you lovelovelove coffee & tea as much as I do, head over to Love Veggies and Yoga for her TAZO Tea Gift Set and French Press giveaway!!!
Friday, March 26, 2010
Thursday, March 25, 2010
Sugah Cookies
Somehow I didn't realize that my last post marked the 100th POST of this blog. I can't believe it! A big thanks to everyone who keeps me motivated to get creative in my kitchen. How exciting is that?? Cody even said, "I can't believe we've eaten 100 different things!" We haven't really; some of the posts are info and giveaways, but still! I love it!
I was going through my blog folder trying to figure out what recipe I was going to put up today and I realized I still haven't done my sugar cookies yet. Oi! These are the most perfect, tasty cookies...I don't know what's wrong with me! They're crispy, but chewy, but buttery, and sweet on top. Perfect for any occasion, so long as you have the appropriate cookie cutter! :)
Sugah Cookies (You have to say it like a true New Englander or they don't taste the same!)
Prep time: 15 minutes
Cook time: 14 minutes
1 cup Earth Balance
3 3/4 cup unbleached all-purpose flour
1 cup white sugar
2 tsp baking powder
3 tsp Ener-G Egg Replacer
4 tbsp water
1/4 cup Tofutti Cream Cheese
1 tsp vanilla extract
1. In a large bowl, cream together the Earth Balance and sugar. Stir in the egg replacements and vanilla. Slowly add the flour, baking powder and Tofutti cream cheese. Form the dough into a long loaf and wrap in plastic wrap. Refrigerate for a couple hours.
2. Preheat the oven to 350° F. Grease the cookie sheets or use parchment paper.
3. On a lightly floured surface, roll out the dough to 1/4 inch thickness. Cut into desired shapes with cookie cutters. Place about 1 inch apart cookie on prepared cookie sheets.
4. Bake for 12 to 14 minutes in the preheated oven, until bottoms and edges just start to get light brown. Remove from baking sheet and cool on wire racks.
What would sugar cookies be without icing???
Sugah Cookie Icing
2 cups confectioners' sugar, sifted
1/2 tsp almond extract
6-8 tsp soy milk
4 tsp light corn syrup
Assorted food coloring
1. In medium bowl, stir together confectioners' sugar and soy milk until smooth. Beat in corn syrup and almond extract until icing is smooth and glossy. If icing is too thick, add more corn syrup.
2. Add food coloring to desired intensity. Dip cookies and allow to dry overnight.
I individually wrapped these cookies in little bags with Valentine's on each one for my coworkers. They're literally perfect. Not too sweet, not too hard, not too vegan....wait. Is there such a thing??
PS: If you were one of my Ener-G Egg Replacer winners, please email me your address so I can get your box out to you!
Tuesday, March 23, 2010
....the envelope, please...
Here are the lucky winners of my Ener-G Giveaway!!!!
Erin @ Living and Loving in L.A., who happens to be doing a giveaway herself, so go check it out!
Leslie @ Better Together
Eco Diva @ Sprouting Dreams
Christina, a new vegan friend who I think should start her own blog... :)
And Katie, who I'm thoroughly excited about winning because she's actually allergic to eggs!
Congratulations, lovely ladies! Send me an email with your mailing information and I'll get your box of Ener-G out to you this week!
Saturday, March 20, 2010
Focaccia Bread
I'm a huge fan of bread. It's almost as if no matter how full I am, there's always room for one more piece of bread or one more biscuit or one last roll. Especially if it's fresh-out-of-the-ove-homemade-delicious-bread.
I've been making this focaccia bread for years. It used to get topped with both mozzarella and parmesan cheese. I pair it with pasta, make panini with it, and it's so easy, even Cody has made it before! That should tell you something. If you're looking for something to go with dinner tonight, why not whip this up? You'll thank me later.
Focaccia Bread
Prep time: 5 minute, plus 20 minutes rise time
Cook time: 15-20 minutes
2 3/4 cups unbleached all-purpose flour
1 teaspoon salt
1 teaspoon sugar
1 tablespoon active dry yeast
1 teaspoon garlic powder
1 teaspoon dried oregano
1 teaspoon dried thyme
1/2 teaspoon dried basil
1 pinch ground black pepper
1 tablespoon vegetable oil
1 cup warm water
2 tablespoons olive oil
1. In a large bowl or electric mixer fitted with a dough hook, stir together the flour, salt, sugar, yeast, garlic powder, oregano, thyme, basil and black pepper. Mix in the vegetable oil and warm water.
2. Continue kneading in the electric mixture until it becomes elasticy and smooth. If mixing by hand, turn onto a lightly floured surface and knead until elasticy and smooth. Lightly oil a large bowl (I just use the bowl I mixed it in!), place the dough in the bowl, and turn to coat with oil. Cover with a damp cloth, and let rise in a warm place for 20 minutes.
3. Preheat oven to 450° F. Punch dough down; place on greased baking sheet. Pat into a 1/2 inch thick circle. Brush top with olive oil. Bake in preheated oven for 15 minutes, or until golden brown. Serve warm.
That's it! That's all there is to it. If you don't make this bread, you're silly. That is all.
Thursday, March 18, 2010
Banana Nut Muffins
This blog goes hand-in-hand with my recent Ener-G Egg Replacer Giveaway. It's a regular recipe made vegan with the help of this amazing product. They're extremely moist and full of flavor. I'm all about buying bananas just so I can bake with them. Keep this recipe in your back pocket if you happen to be one of the FIVE lucky winners of the giveaway.
2 cups unbleached all-purpose flour
1 1/2 tsp baking soda
1/2 tsp salt
4 overripe bananas
1 cup brown sugar
3/4 cup Earth Balance
3 tsp Ener-G Egg Replacer
4 tbsp water
1 tsp pure vanilla extract
1/2 cup walnuts, chopped
1. Preheat oven to 375° F. Lightly grease 2 muffin tins.
2. In a large bowl, combine the flour, baking soda, and salt; set aside. Mash 2 of the bananas with a fork in a small bowl so they still have a bit of texture. With an electric mixer fitted with a wire whisk (like my beautiful KitchenAid), whip the remaining bananas and sugar together for a good 3 minutes. Add the melted butter, Ener-G, water, and vanilla and beat well, scraping down the sides of the bowl once or twice. Mix in the dry ingredients just until incorporated. Fold in the nuts and the mashed bananas with a rubber spatula. Spoon the batter into the muffin tins to fill them about halfway. Give them a rap on the counter to get any air bubbles out.
3. Bake until a toothpick stuck in the muffins comes out clean, 18 to 20 minutes. Let cool for a few minutes before turning the muffins out. Try not to eat them all at once.
That's it! Easy, delicious, and vegan. :)
Tuesday, March 16, 2010
Ener-G! Ener-G!
It's another giveaway, folks!
The wonderful people at Ener-G sent me an entire box full of their amazing egg replacer product to giveaway.
This stuff is absolutely AH-MAZING!!! I use it in pancakes, banana bread, pudding...it's a really great product for people like me who have a crap-ton of regular recipe books. You can literally just use this stuff in place of the eggs! Do you have an egg allergy? Are you vegan? Are you trying to lower your cholesterol? Or are you maybe just trying to lead a healthier lifestyle? I have FIVE boxes to give away...yes, FIVE...to five different lucky readers.
Here are the rules:
You can leave up to five separate comments on the blog, which gives you that many more chances to win.
1. Leave a comment telling me why you want to try this product.
2. Leave a separate comment telling me that you linked back to this product on your blog.
3. Leave another separate comment telling me that you tweeted about this blog.
4. Leave one more separate comment telling me that I'm on your blogroll.
5. And one more to let me know that you put it on facebook or myspace or whatever social network you use.
Hurry up! What are you waiting for???
*I'll be drawing the winner from Random.org on March 22!
Monday, March 15, 2010
Spaghetti & Neatballs
On top of old smooooooookey, all covered with...nutritional yeast.....
Come to think of it, that song is pretty gross altogether, so let's move on.
I had a 5K race yesterday: the Shamrock Shuffle. I've been sick for the last week, haven't been running, the weather was freezing and windy, and the course was hilly and not-so-fun. I made the best of it, though, despite my obvious whining, and came in 6th in the 20-30 age group (which is a rather large age group, no?). Since this blog is less about running (and whining) and more about food, let me tell you how I loaded up on carbs the night before.
I've never been a huge pasta lover. Maybe it was the whole "tomato sauce" thing, or maybe pasta always filled me up to fast...whatever the reason, I just never really cared for it. My love for Eggplant Parmesan has changed all of that, though. I was going to make this meaty dish for my pre-race meal, but I wanted something different. I opted for meatballs.
This recipe is not only vegan, it's gluten free! Bellies rejoice! It is extremely tasty and full of flavor, and surprisingly soy free. It's even better as leftovers!
"Neat"balls
Prep time: 20 minutes
Cook time: 30 minutes
1/2 cup cooked lentils (I used French Green Lentils, because I am franÇais. Oui oui.)
1 cup cooked brown rice
1/4 cup old fashioned oats
1/4 cup + 2 tbsp almond flour
2 tbsp Braggs Liquid Amino Acids (Soy sauce will work fine)
2 tbsp olive oil
2 tsp lemon juice
1/4 cup brown rice flour
1/2 tsp sea salt
1/2 tsp black pepper
1 tsp balsamic vinegar
1/8 tsp nutmeg
1/2 tsp chili powder
1/2 tsp chipotle chili powder (I think it's really important to have this, so if you don't, get some!)
1/2 tsp garlic powder
1 tsp onion powder
2 tsp molasses
2 tsp dry mustard
1. It is extremely important that both lentils and rice are cooked well. No al dente here; slightly mushy is what we're going for. Check out how to cook lentils here and how to cook brown rice here. Once both are prepared and perfectly cooked, head on to step number two!
2. Combine all the ingredients in a large bowl. Preheat oven to 300° F. Spray a baking sheet with cooking spray. Using about 2 tbsp of mixture, roll into balls and place 2 inches apart on prepared baking sheet. Place in the oven using top rack positions. Cook for 15 minutes, then flip and cook for 15 minutes more. Voila! Neatballs!
This recipe doubles easily, so it's great for having people over. I paired it with angel hair pasta, roasted garlic tomato sauce, and some homemade focaccia bread (<----recipe to come!). My brown rice wasn't cooked as much as it could have been, which is why step 1 contains the disclaimer. Some of the pieces were a little chewy. Still tasty, but chewy. As leftovers heated in the microwave, though, it softened them out. Go to your local market now and get some lentils and brown rice out of the bulk section and get started! You won't be disappointed...I promise!
Friday, March 12, 2010
Tofu & Sausage Scramble
I just realized that I haven't put up a recipe for tofu scramble yet. What is wrong with me??? Tofu scramble is an absolute staple in our house and I'm a little embarrassed that I haven't shared mine. I must be crazy.
Cody actually asks for tofu scramble by name. Not scrambled eggs, tofu. I've made it for so many people and it's amazing. (I think I made it for my sister once and I only had firm tofu, so it wasn't quite as good.) Sometimes I'll add some diced potatoes, black beans, veggies, green chile, or I'll wrap it in a tortilla. It holds well as leftovers and is actually quite good for you.
This recipe is a combination of about 100 I've tried over the last year. It comes out a smidge different every time because I'm just like my mother: "a little bit o' this and a little bit o' that..." I can't help it. It's genetic.
Tofu & Sausage Scramble
Prep time: 10 minutes
Cook time: 10 minutes
Tofu "Eggs"
14 oz extra-firm tofu, crumbled*
1/4 tsp garlic powder
2 tbsp nutritional yeast
1 tbsp Braggs (soy sauce will work!)
1/2 tsp turmeric
salt & pepper to taste (I use BLACK SALT for every "egg" recipe I make. I found it at a world market. I don't think it's necessary to make this, but it has such a sulfur-y smell, you'll understand why it's such a good find.)
1 tbsp olive oil
1. In a large bowl, combine the crumbled tofu, garlic powder, nutritional yeast, Braggs (or soy sauce), turmeric, salt, and pepper; set aside.
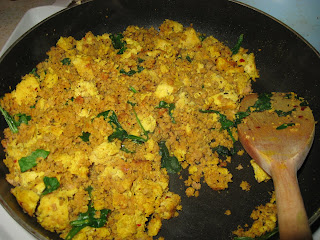
2. In a large nonstick skillet over medium heat, get your olive oil nice and hot. Add the tofu mixture and cook 3 to 4 minutes. The liquid should be gone and it should start to brown, just like eggs. You can either stop here and eat as is or start adding more yumminess to it! (In the picture above, I threw some spinach in because I had tons left in my fridge!)
If you want to add the sausage crumbles to this, here's the recipe! To add: when the tofu has cooked for 2 minutes or so, add the sausage and cook a few minutes longer.
Sausage crumbles
2 tbsp Braggs (or soy sauce)
1 tsp sage
1/8 teaspoon liquid smoke
1/2 teaspoon garlic powder
1/2 teaspoon thyme
1/2 teaspoon fennel seed, crushed
1/8 teaspoon cayenne pepper
black pepper, to taste
1 cup boiling water
1 cup textured vegetable protein (TVP: Try finding this in Bob's Red Mill packages or in the bulk section of your grocery store. If worse comes to worse, just ask someone who works there!)
1. In a bowl, mix together all of your spices and seasonings. Bring water to a boil and pour over mixture.
2. Pour in the TVP, mix with a fork, and let stand for 10 minutes. Fluff with a fork. Taste to see if more seasonings need to be added.
*Tofu Tip o'the Day: I freeze my tofu and let it thaw out before I use it. Mind you, I only do this with firm or extra-firm tofu. It gives it a meatier texture. Try it! You'll be amazed!
Look at all the protein!!! And Calcium!!! And Iron!!! This is a low calorie, low carb, super tasty breakfast dish that you could even eat for lunch and dinner. My nutritional value analyzer doesn't have Braggs listed, so this is with soy sauce. With Braggs, the sodium count is a lot lower. I was so impressed when I plugged in all the ingredients and saw the nutritional value, I decided to see what a non-veggie scramble would be. Check this out:
I replaced the tofu with 8 eggs (4 servings in the tofu scramble, so 2 eggs each for the non-veggie) and took out my sausage and replaced it with 8 oz of regular ground sausage. Look at this...
Calories = +119
Fat = +16.1g (yes, an extra 16.1g of fat.)
Saturated Fat = +6.8g
Cholesterol = 413mg (<---gross)
Dietary Fiber = -2.8g
PROTEIN = -1.3 g (YES! There is less protein in the egg & meat scramble. I know. And carnivores ask where WE get our protein. Mwahahaha!!!)
If you're a seasoned vegetarian/vegan, or you're just curious, I DARE you to try this scramble. You will be shocked at how amazing it is. You might just fall in love with me. Just sayin'.
Wednesday, March 10, 2010
African Peanut Soup
It's amazing how you meet people who don't stick around long (which is probably a good thing!) but make a huge impact on your life. Ok, it's not always a huge impact, but they make an impact nonetheless. When I think back to why I became a vegetarian, I think back to the summer of 2008. I sat there at a bar with a friend, eating a chicken ceasar salad, deciding it was the last time I was going to eat meat. I just wanted to see if I could do it. We decided to try it together. I'm not sure if he stuck with it, but a big THANKS for helping me with that decision. One of the best things I've ever done.
Speaking of firsts, this soup is one of the first vegetarian dishes I ever made. It was ssooooo good, we even sold it at my sister's restaurant a few times. I couldn't believe how delicious it was!
*Please don't mind the sloppiness of the bowl. I had already eaten a bit when I remembered I had to take a picture. It's a heck of a lot prettier than the amount of soup that was all over my face because it's just that good.
African Peanut Soup
Prep time: 10 minutes
Cook time: 60 minutes
*This soup makes A LOT. If you're not cooking for more than two and you don't like a lot of leftovers, I highly recommend cutting this recipe in half!
2 red bell peppers, seeded and diced
1 large onion, diced
4 garlic cloves, minced
2 tbsp olive oil
28 oz can crushed tomatoes
8 cups vegetable broth
1/4 tsp black pepper
1/4 tsp chipotle chile powder (regular will work fine, too)
1/4-1/2 tsp habanero powder or red pepper flakes (you're adding this for heat, so start small!)
2/3 cup chunky peanut butter
1/2 cup uncooked brown rice
1. Heat oil in a (very) large saucepan over medium heat. Saute peppers and onion until tender and they start to brown, about 10 minutes. Add the garlic and saute a little longer. Stir in the crushed tomatoes, vegetable broth, and spices. Bring to a boil, reduce heat to low, and simmer uncovered for 30 minutes.
2. Stir in rice and simmer for another 15 minutes, or until rice is tender. Stir in peanut butter until well blended, simmer for another 5 minutes, and serve.
After plugging all the ingredients into Calorie Count and bringing up the nutritional value, I thought the calories were a little on the high side until I realized one serving is almost 3 cups. That's a lot of soup! This is a pretty hearty soup, too, so it sustains and warms the soul. If you're a seasoned vegan or vegetarian OR you're just trying to cut out meat (Do it! Do it!), this is a soup for you!
PS: If you're NOT thinking about cutting out meat, or you're just looking for a good read, check out this article. Thanks Missy!
Tuesday, March 9, 2010
Strawberry CheezeCupCakes
We had another birthday at work on Friday! My wonderful boss, Rory, celebrated another year. I've heard her talk about these cupcakes that Flying Star make: a vanilla cupcake stuffed with strawberry frosting called Strawberry Blonde. I decided to finagle a similar cupcake for her birthday. Only, you know me, I can't help but throw in 'a little bit a' this and a little bit a' that'.
I made some fabulous vanilla cupcakes thanks to the fabulous ladies who made Vegan Cupcakes Take Over the World. I had some Pillsbury Frosting that is accidentally vegan, plus some Tofutti: Better Than Cream Cheese, and strawberry preserves. I combined all of them. :)
And here is Cody's artistic picutre...
Golden Vanilla Cupcakes
Prep time: 10 minutes
Cook time: 20-22 minutes
1 cup soy milk
1 tsp apple cider vinegar
1¼ cups all-purpose flour
2 tbsp cornstarch
¾ tsp baking powder
½ tsp baking soda
¼ tsp salt (increase salt to ½ teaspoon if you’re using oil instead of margarine)
½ cup non-hydrogenated margarine, softened (I use Earth Balance), or ⅓ cup canola oil
¾ cup sugar
2 tsp vanilla extract
¼ tsp almond extract, caramel extract, or more vanilla extract (I always use almond!)
1. Preheat oven to 350° F. Line muffin pan with cupcake liners.
2. Whisk the soy milk and vinegar in a measuring cup and set aside for a few minutes to get good and curdled. If using margarine: Sift the flour, cornstarch, baking powder, baking soda, and salt into a large bowl and mix. In a separate large bowl, use a handheld mixer at medium speed to cream the margarine and sugar for about 2 minutes until light and fluffy. (Don’t beat past 2 minutes). Beat in the vanilla and other extract, if using, then alternate beating in the soy milk mixture and dry ingredients, stopping to scrape the sides of the bowl a few times. If using oil: Beat together the soy milk mixture, oil, sugar, vanilla, and other extracts, if using, in a large bowl. Sift in the flour, cornstarch, baking powder, baking soda, and salt, and mix until no large lumps remain.
3. Fill cupcake liners two-thirds of the way and bake for 20 to 22 minutes. Transfer to a cooling rack, and let cool completely before frosting.
Cream Cheese Frosting
Prep time: 5 minutes
1/4 cup non-hydrogenated margarine, softened (Again, try Earth Balance)
1/4 cup vegan cream cheese, softened (I like Tofutti)
2 cups confectioners' sugar, sifted
1 tsp vanilla extract
1. Cream together margarine and cream cheese until just combined. Use a handheld mixer to whip while adding the confectioners' sugar in 1/2 cup batches. Mix until smooth and creamy, then mix in the vanilla. Keep tightly covered and refigerated until ready to use.
Ok, so now we prepare.
1. With a clean, washed hand, I used my pinkie to make a whole in each cool cupcake. Now, don't just stick it in, you have to move it around to make room. That's what she said. If you don't have a frosting piping bag, you can fill a ziplock bag and cut a small hole out of the tip. You need to stick the bag into the hole and fill it with as much strawberry frosting as possible.
2. Next I spread about 1 tsp of strawberry preserves on top of each filled cupcake. Nothing tricky or fancy here.
3. This next part is also easier if you have a piping bag, but if you don't, you can just spread the frosting. Use the cream cheese frosting to top the preserves, then put a small dollop of preserves on top of the cream cheese frosting.
That's it! I have to admit, the Pillsbury frosting was a little too sweet for me, but it's what I had on hand so it worked. They were still extremely yummy! A big thanks to my husband for being creative and comparing my beautiful cupcakes to my beautiful orchids. <3
Monday, March 8, 2010
Pasta Day!
I've been finding myself in a crazy state of homesick lately. Not so much for New Hampshire; I always miss my family. No, no...of all places, I'm homesick for Okinawa. Next week it'll be one year since I've been on the tropical island I learned to love and hate all at the same time. I can hardly believe it.
Of course, in all of these pictures, you can't see the humidity. The awful drivers. The certain building on Camp Foster that contained some of the worlds worst leaders that shall remain nameless and made lives hell. Regardless, it still had so much beauty and culture and I miss it.
When I first moved to Japan with Cody, there was a restaurant next door to his work that we used to go to every Wednesday. That had this awesome buffet and what we like to call Pasta Day. You would go and put all of your fixings in a bowl (I used garlic, onions, peppers, red pepper flakes, ham, pepperoni, and black olives). A cook would saute it for you, ask what kind of sauce you wanted (between marinara, shrimp sauce, and pesto, I always chose pesto), then what kind of pasta (I got ziti!). Mix it all together, and voila! You have Pasta Day pasta.
Sometimes I go through my fridge and try to piece every item that needs to be used up and think of what I might be able to make. Pasta Day is a perfect meal for this! Leftover veggies? Saute them and mix 'em with pasta!
Pasta Day!
Prep time: 10 minutes
Cook time: 15 minutes
2 cups uncooked wheat penne, or pasta of your choice
4 cups water
2 tbsp olive oil
1 green bell pepper, sliced
1 red bell pepper, sliced
1/2 onion, diced
5-6 baby bella mushrooms
1/4 cup kalamata olives, diced
1 tsp red pepper flakes (or however much you can handle!)
salt & pepper
1/4 tsp oregano
1/4-1/2 cup Pesto (either use a vegan store-bought pesto or try THIS recipe!)
1. Bring water to a boil over medium-high heat. Cook pasta according to package or to taste! Drain.
2. Heat olive oil in a large skillet over medium heat. Add both peppers, onion, and mushrooms. Saute until mushrooms are nice and brown but other veggies still have some crispiness. Add the olives and spices.
3. When your veggies are done cooking, add the pesto to the skillet and reduce heat to low. Add the pasta, mix it all up, and serve!
If you're like me and sometimes you're not sure what to make for dinner or how to use up shtuff in your fridge and/or pantry, this is one of those great recipes that'll help you out. Add or remove whatever you want, use marinara instead of pesto, cook up whatever pasta you have...there you go. Pasta Day!
Friday, March 5, 2010
And the cook book goes to.........
MELISSA!!!
Melissa (aka Missy) is a Staff Sargeant of Marines and relatively new to the vegan life. It might seem like I played favorites on this one because I'm also training for the San Diego Rock & Roll Marathon with her, but I used Random.org to get my number and it came up 12! A HUGE congrats to Missy! She deserves this cook book and I know she'll put it to good use!
Everyone please stay tuned, though: I have another giveaway coming next week and there will be 5...yes, 5...winners! Thanks for entering! Have a wonderful weekend!!!
Thursday, March 4, 2010
Sausage Patties
What is it about breakfast that is so amazing? It's a treat when you can get in a good breakfast, whether it's in the morning, afternoon, or even at dinner time! From pancakes to french toast to tofu scramble, breakfast might just be my favorite meal....and not just because it's the meal of champions.
(Photo credit)
I've put together some tasty vegan breakfasts over the last year, but this one tops the charts. It was like a Sausage McMuffin, only not so...evil.
(Photo credit)
Here's MY Sausage Patty. You can find the biscuit recipe HERE (Just make the biscuits larger!)
Sausage Patties
Prep time: 5 minutes
Cook time: 10 minutes
1/2 cup tvp
1/2 cup boiling water
1/2 cup whole wheat flour (the second time I made these, I only had barley flour on hand. Worked just as well!)
1/4 cup almond meal
1 tbsp nutritional yeast
1 tsp garlic powder
1/2 tsp crushed sage
1/2 tsp fennel seeds (Cody's job is to grind these in his mortar & pestle. He loves it.)
1/4 tsp black pepper
1/4 tsp salt
1/8 teaspoon cayenne
1 tbsp ground flax seeds
1/4 cup water
1/2 tsp liquid smoke
3 tbsp Bragg's Liquid Aminos (Soy sauce will work just fine)
1 tsp maple syrup
1/4 tsp black strap molasses
Oil for frying
1. Stir together tvp and boiling water and set aside to soak for 5 minutes.
2. Add flour, almond meal, and dry spices; stir to incorporate. In a glass measuring cup, measure out water; add liquid smoke, Bragg's (or soy sauce), maple syrup, and molasses directly to the cup and stir. Add water mixture to dry; mix well. With your hands, form mixture into 2″ balls and flatten slightly into patties.
3. Fry in oil in an uncovered frying pan on medium heat, about 4 minutes per side, or until brown.
Here is the nutritional value in mine:
And here is the nutritional value in McDonald's:
Sure, the calorie count isn't that different. Take a look at the fat, though. And saturated fat. And cholesterol. And how is it that the vegan patties have more protein and iron? That part makes me laugh because people always ask me where I get my protein from. Maybe I should start asking them where they get their protein from!!! Ok, I'm off my high horse. Make these! Do it!
And don't forget about my Vegan Cookies Invade Your Cookie Jar giveaway!
(Photo credit)
I've put together some tasty vegan breakfasts over the last year, but this one tops the charts. It was like a Sausage McMuffin, only not so...evil.
(Photo credit)
Here's MY Sausage Patty. You can find the biscuit recipe HERE (Just make the biscuits larger!)
Sausage Patties
Prep time: 5 minutes
Cook time: 10 minutes
1/2 cup tvp
1/2 cup boiling water
1/2 cup whole wheat flour (the second time I made these, I only had barley flour on hand. Worked just as well!)
1/4 cup almond meal
1 tbsp nutritional yeast
1 tsp garlic powder
1/2 tsp crushed sage
1/2 tsp fennel seeds (Cody's job is to grind these in his mortar & pestle. He loves it.)
1/4 tsp black pepper
1/4 tsp salt
1/8 teaspoon cayenne
1 tbsp ground flax seeds
1/4 cup water
1/2 tsp liquid smoke
3 tbsp Bragg's Liquid Aminos (Soy sauce will work just fine)
1 tsp maple syrup
1/4 tsp black strap molasses
Oil for frying
1. Stir together tvp and boiling water and set aside to soak for 5 minutes.
2. Add flour, almond meal, and dry spices; stir to incorporate. In a glass measuring cup, measure out water; add liquid smoke, Bragg's (or soy sauce), maple syrup, and molasses directly to the cup and stir. Add water mixture to dry; mix well. With your hands, form mixture into 2″ balls and flatten slightly into patties.
3. Fry in oil in an uncovered frying pan on medium heat, about 4 minutes per side, or until brown.
Here is the nutritional value in mine:
And here is the nutritional value in McDonald's:
Sure, the calorie count isn't that different. Take a look at the fat, though. And saturated fat. And cholesterol. And how is it that the vegan patties have more protein and iron? That part makes me laugh because people always ask me where I get my protein from. Maybe I should start asking them where they get their protein from!!! Ok, I'm off my high horse. Make these! Do it!
And don't forget about my Vegan Cookies Invade Your Cookie Jar giveaway!
Tuesday, March 2, 2010
Curried Butternut Squash Soup
Sometimes I just want soup. In a bowl, in a mug, whatever the case may be, soup is as soothing to me as a glass of wine in hand while taking a bubble bath. Ok, not that soothing, but soothing nonetheless.
I'm also a huge fan of butternut squash. Mashed up like potatoes, cubed and roasted, or in ravioli, I have a soft spot for this yummy fruit-veggie. Combine my love of soup and butternut squash and you have one happy vegan. This soup was fairly simple to make, plus, all I had to go out and get was the squash!
Curried Butternut Squash Soup
Prep time: 10 minutes
Cook time: 60 minutes, plus 10 minutes
1 butternut squash, halved and seeded
1 large onion, peeled and quartered
1 medium head garlic
6 cups vegetable broth
1 bay leaf
1 teaspoon brown sugar
1 teaspoon mild curry powder
1/2 teaspoon dried oregano
1/2 teaspoon ground cinnamon
1/4 teaspoon ground nutmeg
salt and pepper to taste
1 cup plain soy yogurt
1. Preheat oven to 350° F. Line a baking sheet with parchment paper or aluminum foil.
2. Place squash halves and onion onto the prepared baking sheet. Wrap garlic in foil and set with other vegetables. Roast in the center of the oven for 45 to 60 minutes, until the squash is tender. Remove from oven and set aside until cool enough to handle.
3. Squeeze garlic cloves out of their skin like paste into a food processor. Scrape the flesh from the squash and place into the food processor along with the roasted onion. Puree until smooth. Add vegetable broth if necessary. Transfer the pureed mixture to a stockpot and stir in vegetable broth. Season with the bay leaf, brown sugar, curry powder, oregano, cinnamon, nutmeg and salt and pepper to taste. Bring to a boil and simmer gently for 10 minutes. Remove from heat and stir in soy yogurt. Remove bay leaf and serve hot.
*I double checked this recipe and its analysis. It is correct. 111 calories. It's a little high in sodium, but if you use low sodium vegetable broth, that'll knock some of it outta there for you!
This soup had the sweetness of the butternut squash and brown sugar with the pungent flavor of the curry topped with the smoothness of the yogurt. It was even better the second day. Pair it with a samich or some homemade bread and you've got yourself a meal. Enjoy!
Subscribe to:
Posts (Atom)